How to clear your cache on Android (4 simple steps with pictures)
by Miles Warren
March 25,2022
Though it may sound a bit drastic, clearing your phone’s cache might be a good idea for a few reasons. The cache is where your phone stores data associated with the applications that you have installed, such as images, so you don’t need to wait as long for the app to load when you open it.

That said, if an app starts behaving strangely, clearing the cache might be one way to get things back to normal. You may also want to clear your cache to free up some more memory on your phone. Whatever the reason may be, here’s how to clear your Android phone’s cache in a few quick and easy steps.
How to clear your cache on Android
First off, there are apps that you can download to clear your cache for you. You can download one of the best ones for the job below. However, you can also do it manually yourself, so we also have the following step-by-step instructions.

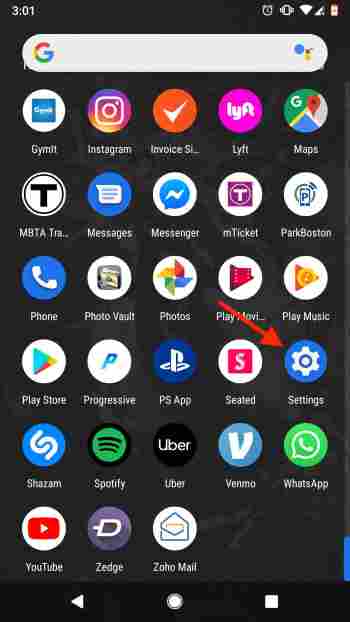
1. Open the Settings menu

From your phone’s home screen, head over to the Settings menu. This usually appears as a small gear icon in the top right corner of your phone’s dashboard, and can also be accessed via an icon in the app menu.
2. Open the Storage menu
Once in the Settings menu, you’ll see a variety of options.
Scroll until you see the Storage menu, then tap it to access it. Here, you’ll see a detailed breakdown of exactly how your phone’s data is allocated. You’ll also see your installed apps broken down into different categories based on their function, such as “Games,” “Movie and TV,” or “Other apps.”
From this top menu, you’ll also see a shortcut labeled “Free up space.” If you want to quickly free up some of your phone’s memory, tapping this key will automatically purge any cache data that your phone considers to be unnecessary .
This can be a great option if you’ve noticed that your phone’s acting a little sluggish or if you just need to make a bit more space. If you’re having problems with a specific app or you want to have some more control over what data gets cleared, head to Step 3.
3. Choose your category
As stated above, all your apps are subdivided into certain categories. In general, most apps can be found in the “Other apps” tab. Click through the different categories until you find the app that you want to clear, then select it.
4. Choose how much data you want to clear
Once you’ve selected the specific app, a new menu will open displaying cache data pertaining to the app you’ve selected. At the top of the menu, you’ll see two buttons: “Clear Storage” and “Clear Cache.”
Tapping “Clear Cache” will get rid of any cache data associated with the app. This includes images and other saved content, meaning that the next time you use the app, it will need to connect to the internet to re-download any content it needs to function.
Usually, clearing the cache and re-downloading data like this will solve any problems if you notice an app behaving strangely.
“Clear Storage” will get rid of any and all data associated with the app, including data such as saved passwords or, in the case of mobile games, save data. If you have dozens of things unlocked in a game like Knife Hit , this probably isn’t the best option.
Wrapping up
Whatever the reason may be, clearing your cache is easier than it sounds. Whether you’re trying to clear space or fix a problem app, following these quick steps should clear things up in no time.
More about Android
How to block texts on Android ►
Android antivirus apps aren’t as useful as you think they are ►
How to find your lost or stolen Android phone or tablet ►
How to save battery on your Android ►
